Policies are the heart of Azure API Management. They let us change the behavior of our APIs in a very flexible manner. Before I dive in to policies, I will discuss the core concept of Azure API Management. At the end, I’ll go through some examples.
Agenda
- What Azure API Management Policies are
- Core Concept of Azure API Management
- How to define Azure API Management Policies
- Examples
- Aggregated Azure API Management Policy
What Azure API Management Policies are
Azure API Management Policies let you change the behavior of APIs through a combination of XML and C#. They are executed on the request or response of an API. Since we are dealing with code, we are very flexible in what we can change. We can for instance check for a certain header in a request before forwarding the request to the backend. We can also prevents API usage spikes by limiting call rate, or mock responses for endpoints that are not implemented yet but important for certain test scenarios.
Before we start implementing some examples, it is important to understand where we can apply a policy. In short, we can apply a policy globally, on a product-level, one for every API, and a policy for each endpoint. If you haven’t worked with Azure API Management yet, it’s a great time to discuss the core concept of Azure API Management before continuing. Otherwise, you can skip the following chapter.
Core Concept of Azure API Management
Many APIs are specified in Swagger-files like the Conference API. This API bundles those endpoints - we call them Operation in Azure API Management - that together make up the conference service - in this case the API bundles endpoints like /sessions, /topics, /speakers, and some more. Companies like Vipps, a Norwegian payment service and where I work, have many APIs, and not all its costumers need access to all of them. The Vipps App needs access to APIs that are specifically developed for it. Merchants that want to use Vipps as a payment service for their customers need some other services than the Vipps App. To make this distinction, and to provide clients access to only a subset of available APIs, Azure API Management has the concept of Products. To use a product, a User/Client has to Subscribe to a Product.
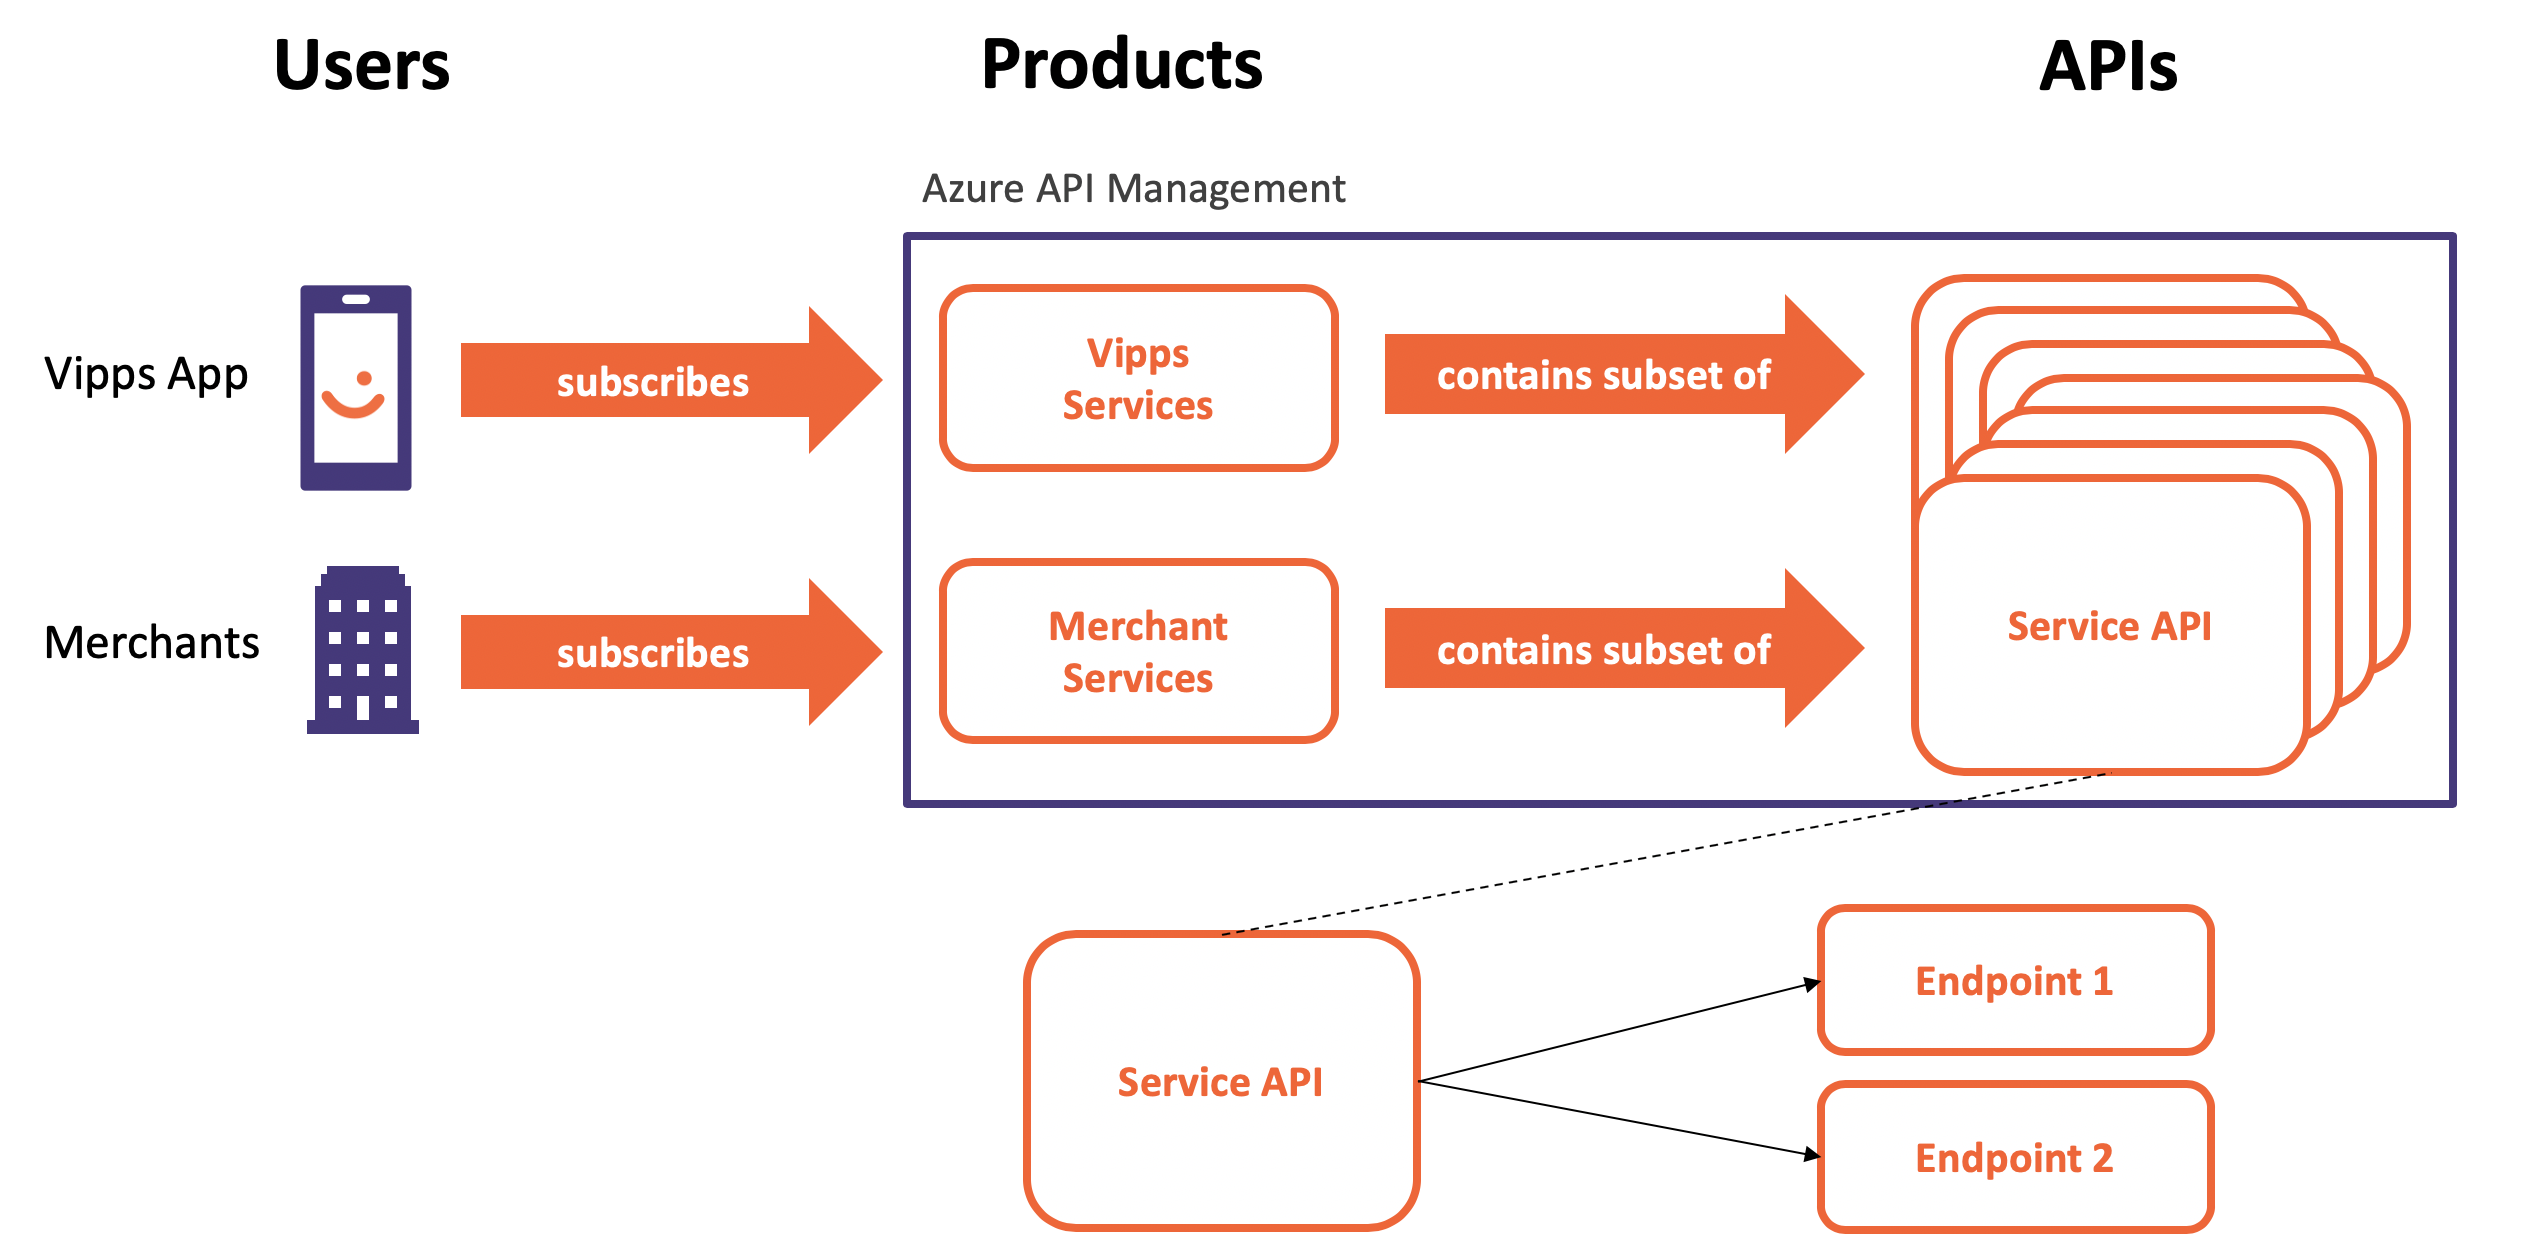 Core Concept of Azure API Management
When it comes to Azure API Management policies, we can define them at every level. Every endpoint/operation can define its own policy and change requests and responses. The same is true for all APIs, and products. We can also define a policy that applies to all requests and responses.
How to write Azure API Management Policies
An Azure API Management Policy defines 4 sections, inbound, backend, outbound, and on-error. As the diagram below shows, changes to the request are implemented in the inbound section. Changes to the request before forwarded to the backend service in the backend section, and responses can be changed in the outbound section. In case the backend can’t be reached, and a timeout happens, the on-error section is triggered. It’s probably a good idea to handle errors as well.
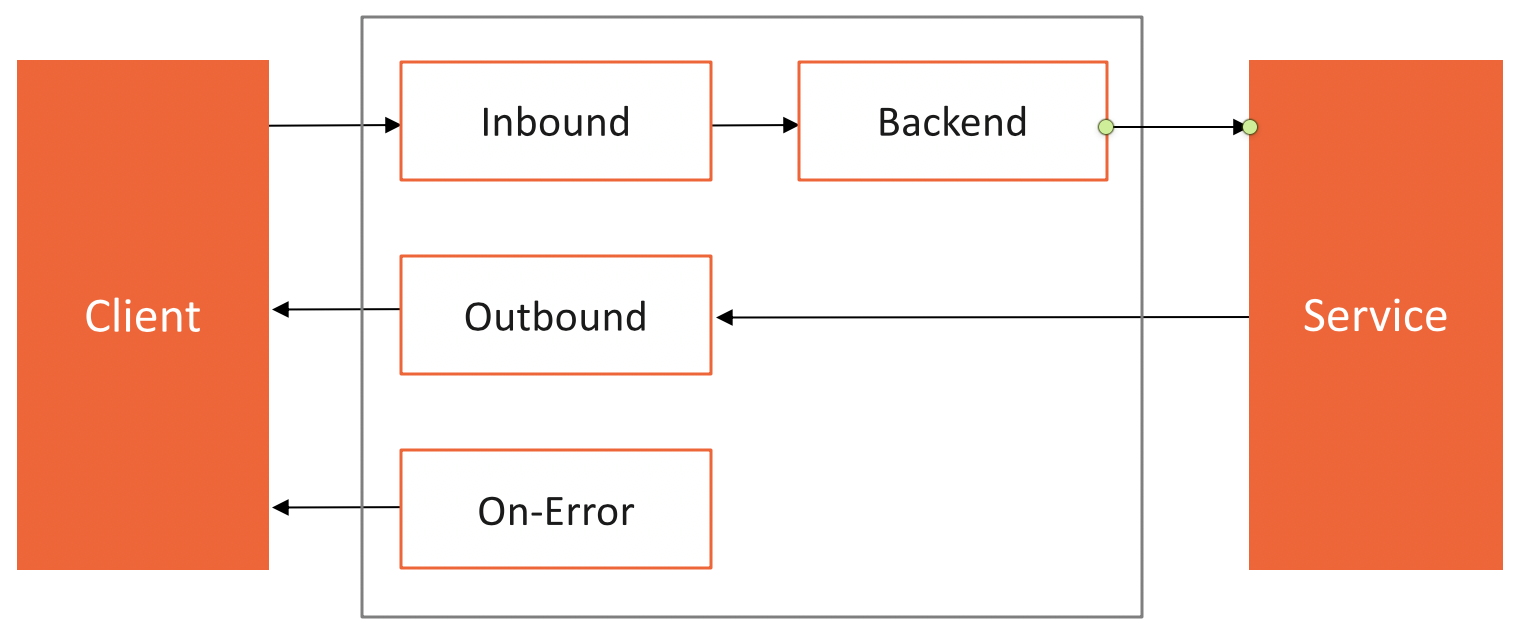 Azure API Management Policy Definition
The following code shows a bare policy where you can add headers to requests and responses, or validate requests and responses, or convert a response body from xml to json. These are just a few out of many examples of Azure API Management Policies.
<policies>

  <inbound><!-- Change the Request -->
  </inbound>

  <backend>
    <!-- Change the Request before forwarded to the backend service -->
  </backend>

  <outbound>
    <!-- Change the Response -->
  </outbound>

  <on-error>
    <!-- Change the Response in case of an error like a timeout -->
  </on-error>

</policies>
You can change a policy directly in the portal. In the example below, we change the policy of the endpoint GetTopics of the Conference API.
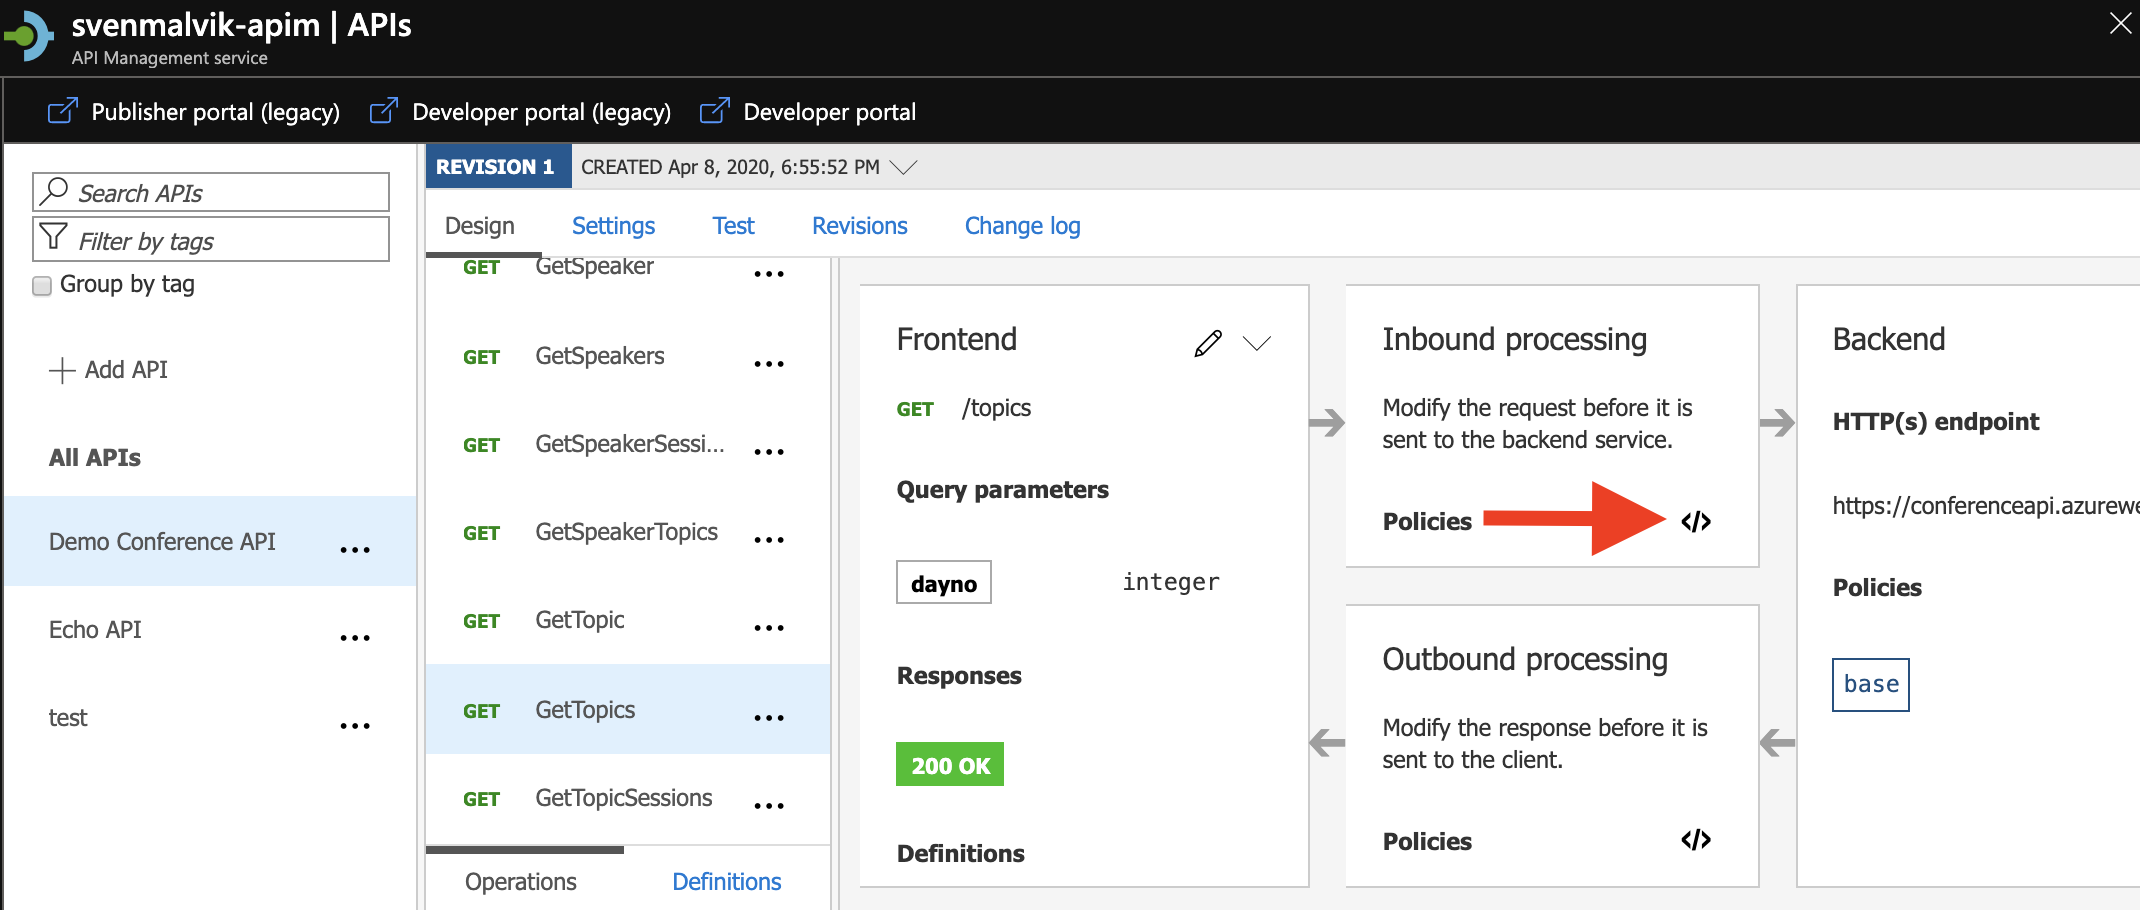 Open API Management Policy in Azure portal
Examples
Before we go on and discuss how to debug a policy, let’s discuss some examples first. We will use the Echo API.
Examples 1: Mocking an Endpoint
In the following code snippet, I added a mock response to the inbound section of the Retrieve headers endpoint.
<inbound>
    <mock-response status-code="200" content-type="application/json" />
</inbound>
Examples 2: Adding header to API response
Let’s now add a header to the outbound section of the Echo API. That means that any calls to this API will have the header in its response.
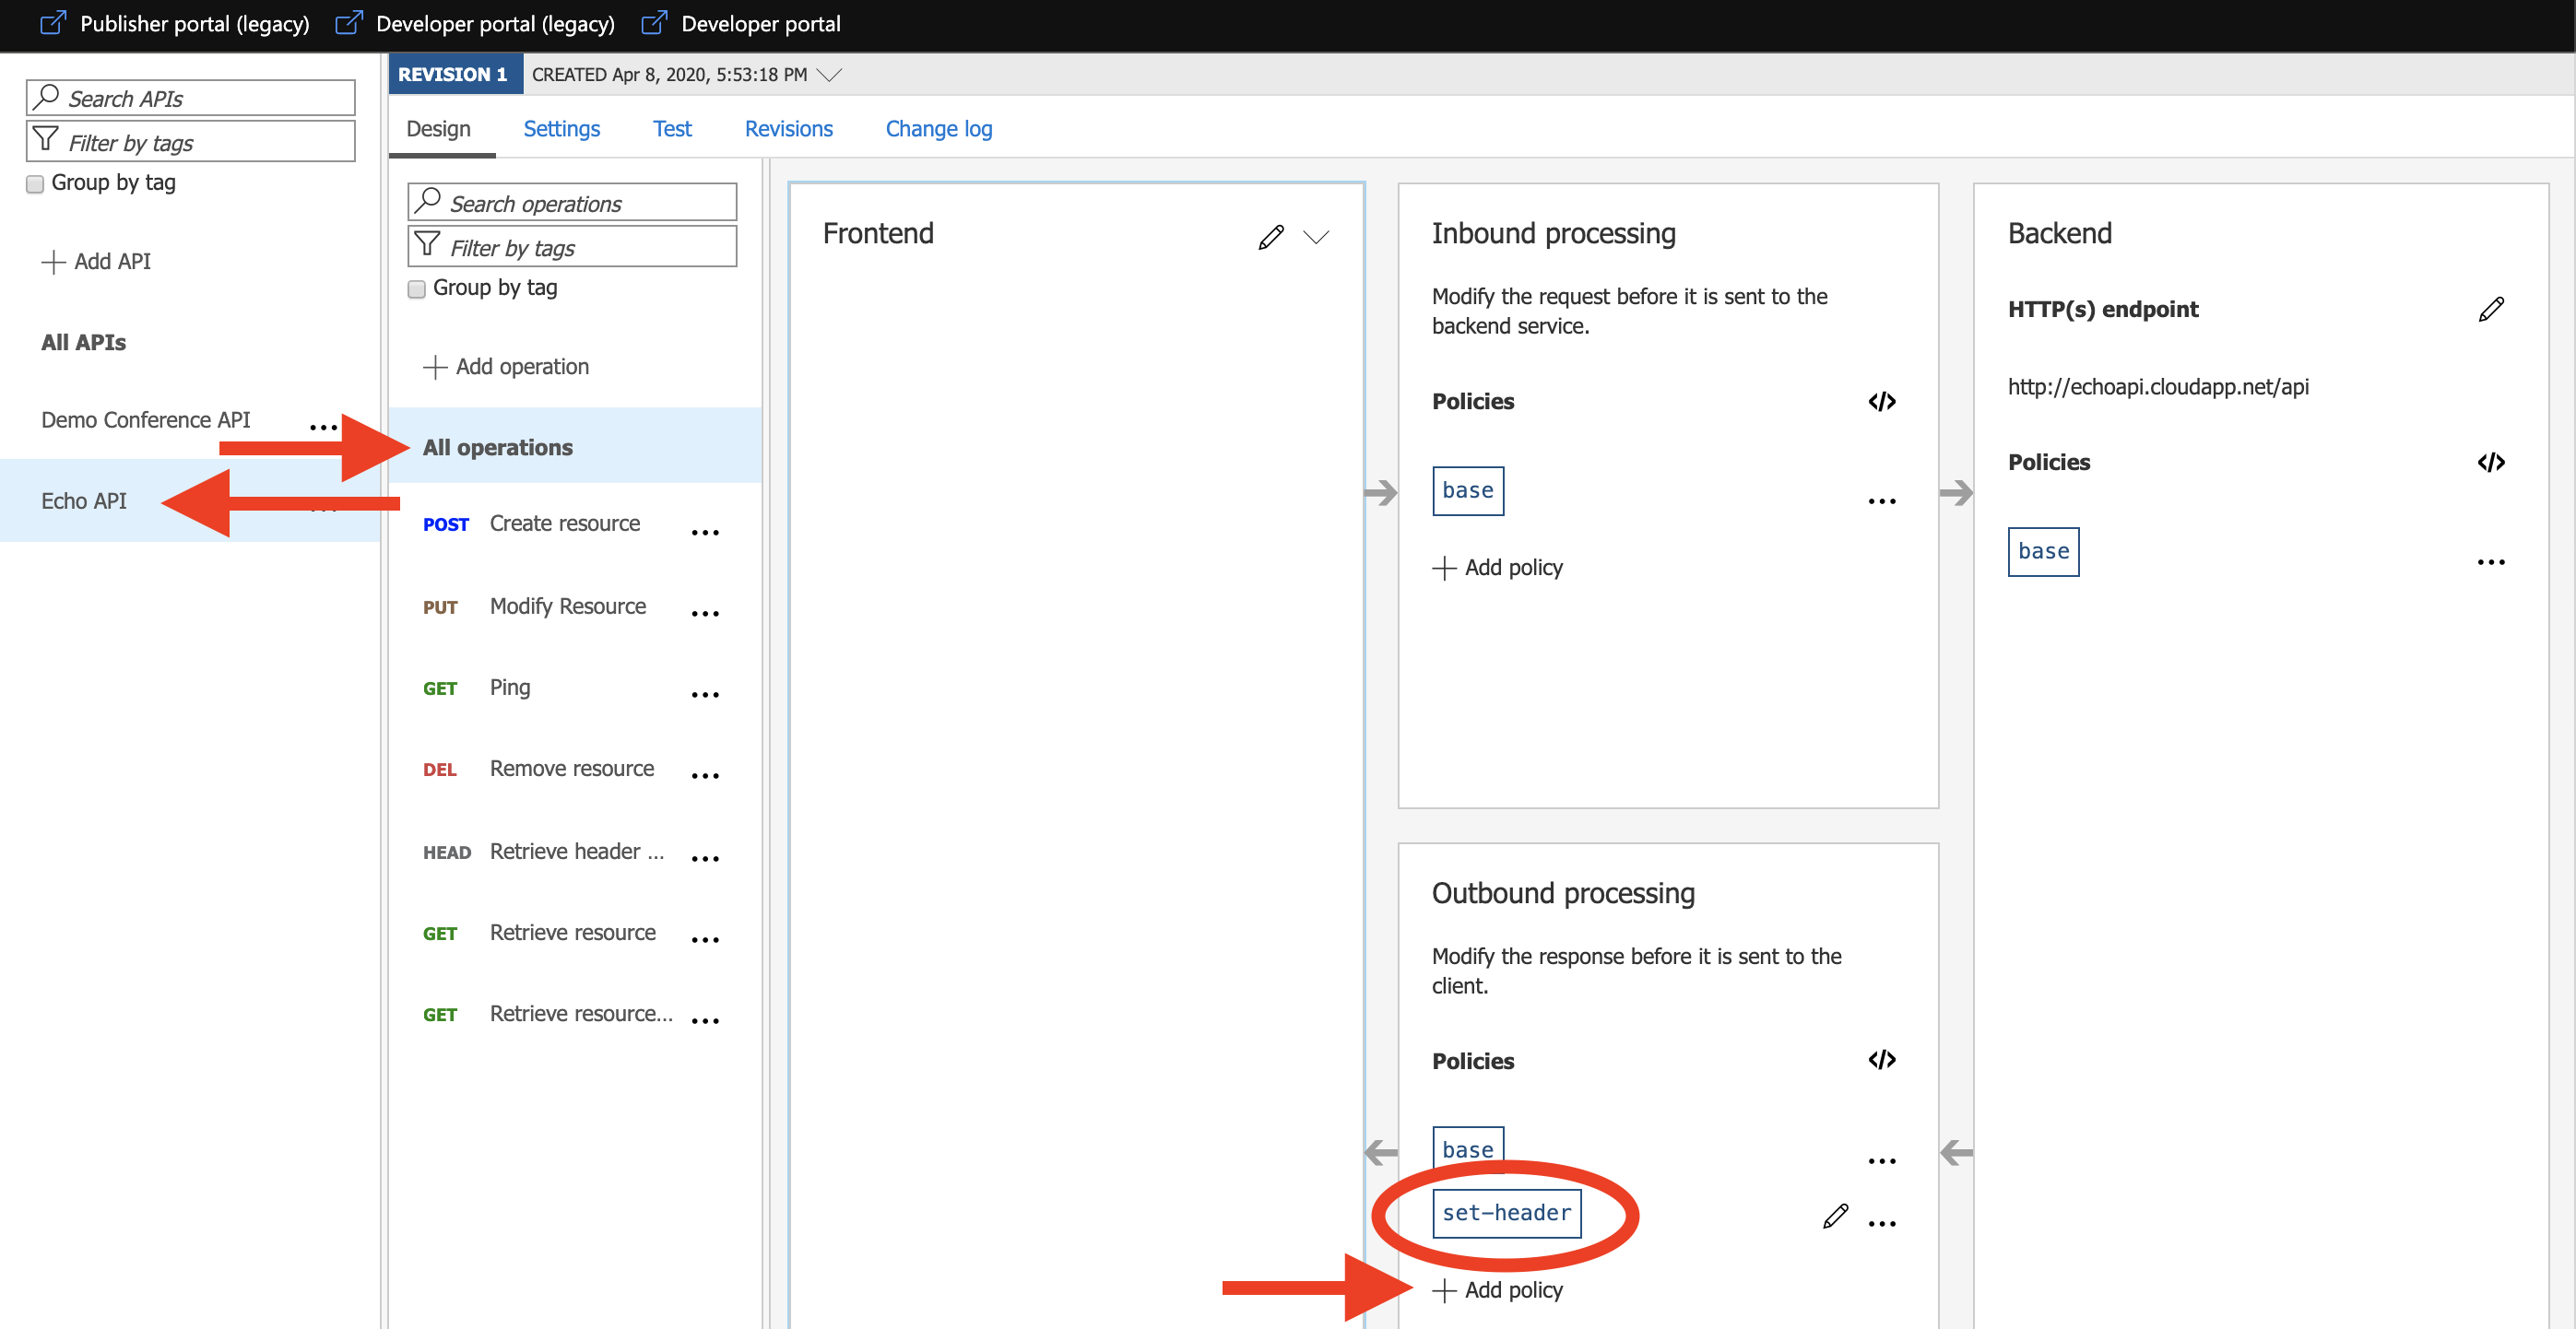 Adding header to API response in Azure API Management
Examples 3: Adding rate limiting on product-level in Azure API Management
On the product-level, we will protect our backend from excessive calls.
 Adding rate limiting on product-level in Azure API Management
Examples 4: Adding global policy
The global policy applies to all endpoints. I have added an ip filter to the inbound section telling that only I am allowed to send requests.
 Adding global policy to Azure API Management
Aggregated Azure API Management Policy
Earlier, I told about endpoint-, API-, product- and global-policies. When I define policies at each level, how does the complete policy look like? What gets overwritten or not? First of all, what gets overwritten or not is up to the developer. We take a look at the inbound-section to explain what I mean.
<policies>

  <inbound>
    <base/> <!-- The upper level gets inserted here -->
    <!-- Change the Request -->
    <base/> <!-- The upper level gets inserted here -->
  </inbound>

</policies>
</base> can be defined either before or after your code, but not twice. In case you don’t define </base>, nothing will be inserted.
We can imagine that implementing code in each section at every level might result in many lines of code. To get the complete Azure API Management Policy for your endpoint - or another level - we can aggregate them by calculating it from within the Azure portal.
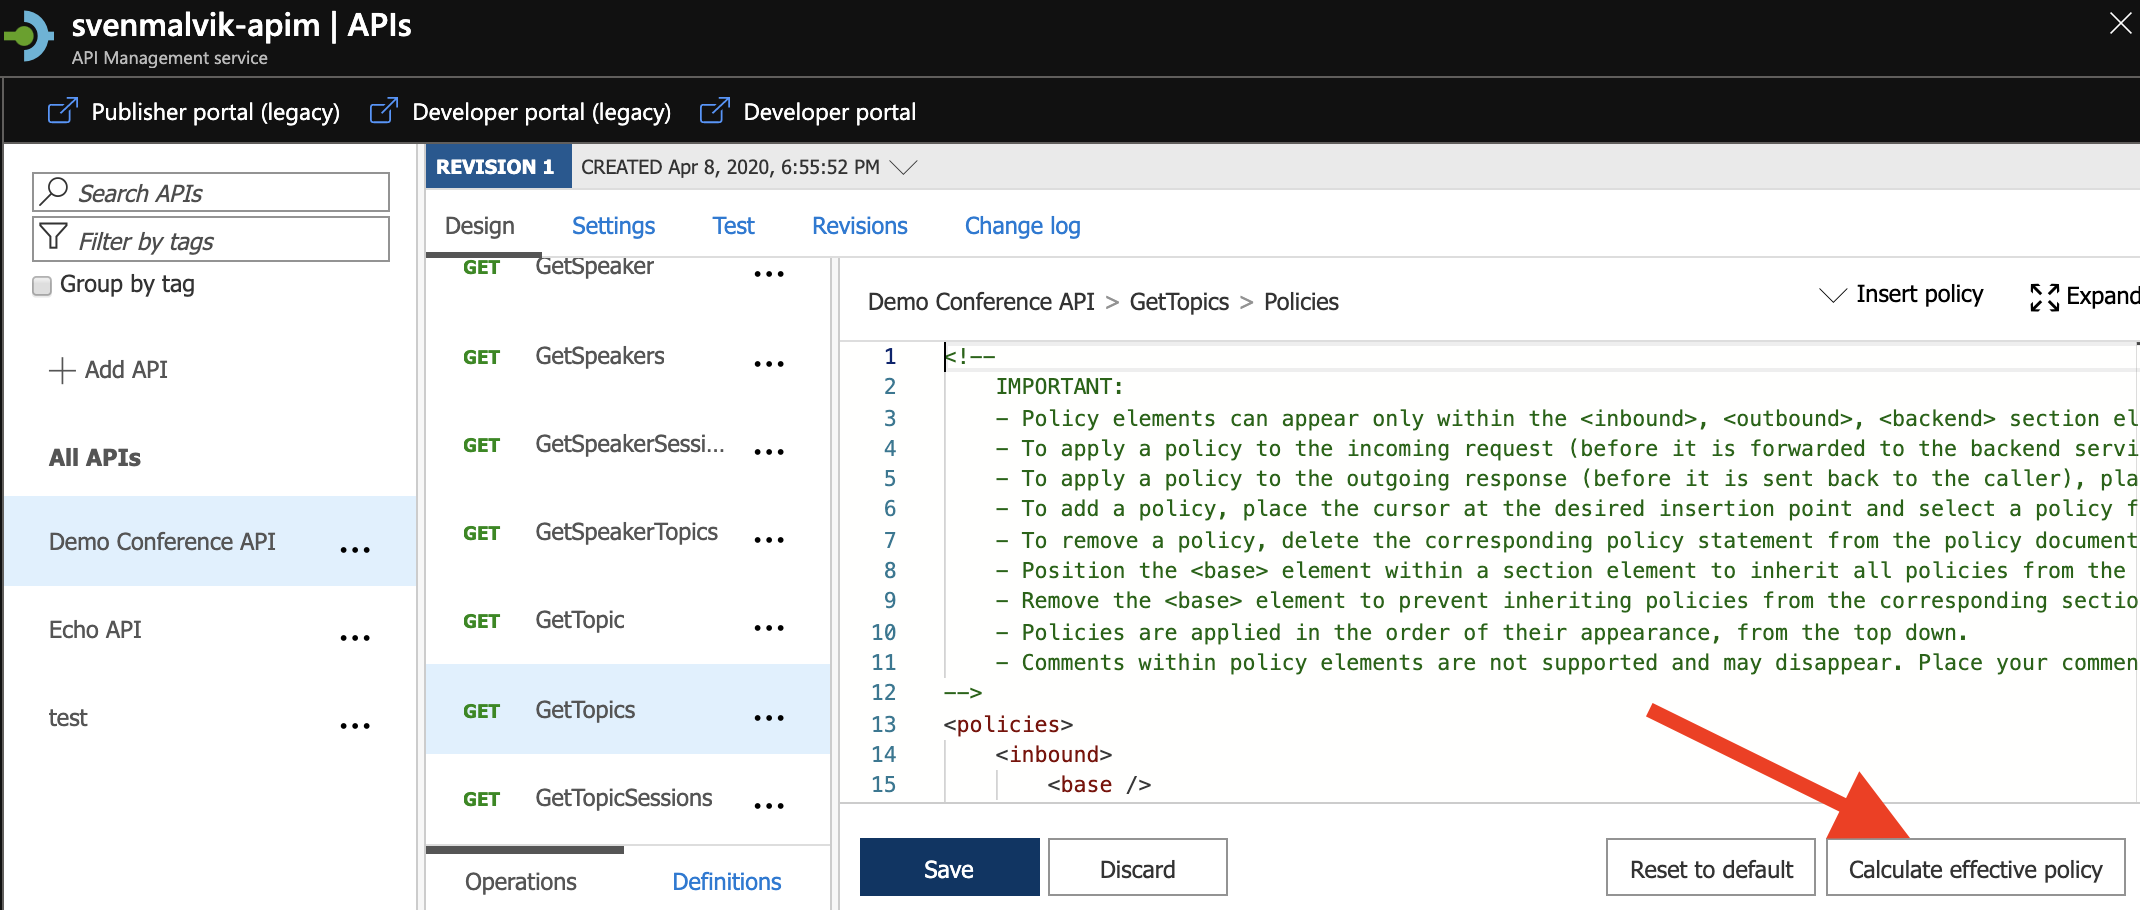 Calculate complete Azure API Management Policy
<policies>
    <inbound>
        <!--base: Begin Api scope-->
        <!--base: Begin Product scope-->
        <!--base: Begin Global scope-->
        <ip-filter action="allow">
            <address-range from="51.175.196.188" to="51.175.196.188" />
        </ip-filter>
        <!--base: End Global scope-->
        <!--base: End Product scope-->
        <!--base: End Api scope-->
    </inbound>
    <backend>
        <!--base: Begin Api scope-->
        <!--base: Begin Product scope-->
        <!--base: Begin Global scope-->
        <forward-request />
        <!--base: End Global scope-->
        <!--base: End Product scope-->
        <!--base: End Api scope-->
    </backend>
    <outbound>
        <!--base: Begin Api scope-->
        <set-header name="echoTest" exists-action="append">
            <value>true</value>
        </set-header>
        <set-header name="X-My-Sample" exists-action="override">
            <value>This is a sample</value>
        </set-header>
        <!--base: End Api scope-->
        <jsonp callback-parameter-name="ProcessResponse" />
    </outbound>
    <on-error />
</policies>
Conclusion
There’re many places we can define policies. It’s therefore extra important to be careful with how much we put into them. I’ve seen aggregated policies that had hundreds of lines of code. This is a hard situation when working in an environment with many developers and many APIs where APIs are shared across many products.
We have covered the basics of policies, and hopefully this post has given you an idea of how they work in Azure API Management. Reach out to me in case you have questions or you are interested in a talk or workshop about Azure API Management.
 Sven Malvik